
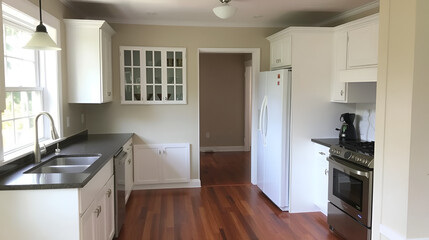
San Jose Cabinet Refinishing is one of the best ways to update a kitchen without going through a full-scale remodel. This process involves cleaning, sanding and priming to create a durable finish that will hold up to years of wear.
Start the project by carefully removing cabinet doors and drawers and labeling each piece for easy reassembly later. Next, wipe down all surfaces.
Preparation
Cabinet refinishing transforms drab, worn-out cabinets into a rejuvenated space with minimal disruption and cost. However, this process requires careful preparation to yield the best results and durability.
The first step of a cabinet refinishing project is to clean the cabinet surfaces. This step is essential to a successful finish, as it removes any grease, wax, and dirt that may have built up over time. It also removes dust and debris that can cause the final finish to dull or discolor over time. Using a degreasing solution and a soft cloth, carefully clean the cabinet interior and exterior surfaces, making sure to reach every nook and cranny.
After cleaning, it is important to sand the cabinet surface. This will create a smooth, even texture that will allow the new coat of paint or stain to adhere to the surface. Ensure that you use a sanding sponge or hand sander and follow the grain of the wood for best results.
It is also a good idea to sand the cabinet hinges and handles. This will help the reassembly of the doors and drawers go more smoothly later on. Once the sanding is complete, you should apply a primer. Choosing a high-quality primer that will promote adhesion and prevent moisture damage is essential for the success of your cabinet refinishing project.
Once the primer is dry, it is a good idea to label each cabinet door and drawer opening for easy reassembly later on. This small detail can save you a lot of frustration when it comes to reassembling your kitchen.
Sanding
Cabinet refacing and refinishing are the two main options when it comes to transforming the look of your kitchen cabinets. While refacing replaces your existing doors and drawer fronts with new materials, refinishing takes the current door and cabinet box structures and applies an updated finish to them. The main differences between these projects are their time commitments and costs. Both can give your kitchen a complete overhaul, but refacing is more labor intensive and carries the added cost of moving electrical or plumbing, which you don’t need to do with refinishing.
When it comes to preparing your cabinets for painting, proper sanding is essential. This process roughens the surface of your cabinet, creating tiny grooves that help the paint grip the wood and prevent peeling or chipping in the future. To avoid unnecessary damage, always use a finer sandpaper grit and work gently over the entire cabinet surface. If you choose to sand by hand, opt for a sanding block instead of a handheld sander to minimize the chance of gouges and scratches.
Before you start sanding, make sure your sandpaper is clean and ready to use. Over time, grease and food splatters can build up on your sandpaper and render it useless within minutes, especially in the damp, warm conditions of a kitchen. Clean your sandpaper regularly with warm water or a degreaser to keep it in good condition and make the sanding process easier.
While some cabinet painters may suggest skipping this step, it’s important to take the time to properly sand your cabinets before repainting them. Failing to do this could lead to poor paint adhesion, which can cause your new coat of paint to crack, bubble, or peel within a few months.
Primer
While skipping the priming step might save you a few minutes, this preparatory stage is crucial to achieve long-lasting results. Primer provides a uniform surface that enhances paint adhesion, resulting in visual appeal and durability. Without primer, moisture seeps into unprotected wood and can cause swelling or warping. Primer locks out moisture and helps prevent stains from bleeding through finish coats, allowing your new cabinet paint to look smooth and fresh for longer.
Kitchens are moisture-prone, so you’ll want to choose a fast-drying, low-odor primer that is also mildew resistant. KILZ 3 Premium Primer offers excellent adhesion and coverage and is ideal for high-moisture areas.
Light-colored cabinets have become a popular design trend that brightens and elevates the kitchen. For best results, apply two coats of premium white kitchen paint over a clean, well-sanded surface with a durable kitchen-friendly primer like KILZ 3 Premium Primer. If you prefer a more neutral color, gray has become the “third neutral” in kitchen design and pairs well with natural wood elements.
When selecting a color for your cabinet refinishing project, consider leaving some wood elements unpainted to create textural contrast in the space. This approach adds character and intrigue while lowering your total cost of ownership.
Once you’ve finished your refinishing job, it’s time to add finishing touches to your newly painted or stained cabinets. For an extra pop of color, paint your cabinet hardware a coordinating shade. Choose from a variety of spray, brush and aerosol options that are easy to use and dry quickly. For a smooth finish, use a foam roller to minimize brush marks. If your cabinets are metal, use a primer specifically designed for metal. Metal primers can contain materials such as tin or zinc that protect against corrosion.
Paint or Stain
Ultimately, the decision to paint or stain cabinets is a reflection of your design preferences and willingness to commit to regular maintenance. The versatility of paint offers an array of color options, while staining showcases the innate beauty of wood grain.
When painting cabinets, a high-volume, low-pressure (HVLP) spray gun is the most effective tool for achieving a smooth, factory-like finish. Unlike traditional brushes, the HVLP device sprays a fine mist of paint in an even stream, minimizing brush strokes and imperfections. To achieve a flawless finish, meticulous prep work including sanding and priming is paramount.
Achieving a sleek, modern aesthetic with painted cabinets requires coordination with the kitchen’s other features. To complement the solid finish of your cabinets, select hardware with a contemporary design. Streamlined handles and bar pulls in stainless steel or chrome can elevate the contemporary look of your cabinetry. Alternatively, you can coordinate the cabinet hardware with your countertop or floor to enhance the cohesiveness of your overall design.
If you choose to stain your cabinets, a quality water-based or oil-based stain is a must. Staining is a time-intensive process, but it allows the wood grain to shine through and is less likely to chip or crack than painted finishes. Stained cabinetry also requires regular re-staining to preserve the integrity of the surface.
When staining cabinets, you can create a rustic or traditional style by choosing darker stains that add depth and richness to the wood tone. Staining also accentuates the craftsmanship of your cabinetry, and its natural appearance enables you to appreciate the quality of materials used in the construction of your cabinet boxes. In addition, stained cabinets are less likely to need refinishing due to moisture or humidity, whereas painted finishes can be damaged by these factors.
Sealing
Cabinet refinishing is an excellent option for homeowners who want to update the look of their kitchen without spending a fortune on new cabinets. This process involves sanding, painting, or staining existing doors and drawer fronts to give the room a fresh, updated look. It is also an environmentally friendly alternative to replacing the cabinetry. Refinishing reduces waste and the need for new materials, resulting in lower carbon emissions and less demand for natural resources.
Once you’ve sanded and repaired any areas with damage or imperfections, it’s time to apply the finish of your choice. It’s important to apply several thin coats, allowing the previous layer to dry thoroughly before applying the next, to achieve full and even coverage. Using high-quality paint will result in a smoother, more professional finish. For stains, the same applies; multiple thin coats will yield a more durable result than a single thick one.
After the final coat of your chosen finish has dried, it’s time to seal it. This will help preserve the hard work you’ve put into your kitchen cabinets, and ensure that the finish lasts as long as possible. A good polyurethane or varnish will protect your cabinets, keeping them looking fresh and new for years to come.
Refinishing your cabinets is a project that requires some serious elbow grease and patience, but the results can be well worth it. The extra step of sealing your cabinets is vital to extend their lifespan, helping them withstand the rigours of daily use. It also adds a protective coating, which helps shield them from scratches and other forms of wear and tear. Keeping a few extra containers of your chosen finish on hand will make it easier to touch up small imperfections as they happen, giving your cabinets a consistent and polished look for years to come.